ASA and traceroute

By default ASA does not decrease the TTL field, hence is not visible in traceroute output. This is how to change this behaviour :

asa# conf t
asa(config)# icmp unreachable rate-limit 10 burst-size 5
asa(config)# policy-map global_policy
asa(config-pmap)#
asa(config-pmap)#  class class-default
asa(config-pmap-c)# set connection decrement-ttl

The result:

asa# sh run
. . .
icmp unreachable rate-limit 10 burst-size 5
. . .
policy-map global_policy
 class inspection_default
  inspect dns preset_dns_map
  inspect ftp
  . . .
  inspect icmp
  inspect sunrpc

 class class-default
  set connection decrement-ttl

service-policy global_policy global
. . .

Sources:
http://www.cisco.com/en/US/products/hw/vpndevc/ps2030/products_tech_note09186a0080094e8a.shtml
http://packetu.com/content/view/50/

Crash recovery after updating Win7 x64

Not sure if it’s a problem of VirtualBox, but when trying to install Win7x64 SP1 Windows stuck with the following message:

Fatal error C0000034 applying update operation 282 of 117809 (_00000…)

This method helped!

YEP I GOT IT WORKING!! I DONT KNOW IF MY METHOD IS THE BEST BUT IT WORKS!

This method works without Safe Mode, without backups, without System Restore, without DISM, and without a Windows 7 DVD repair disc.

INSTRUCTIONS:

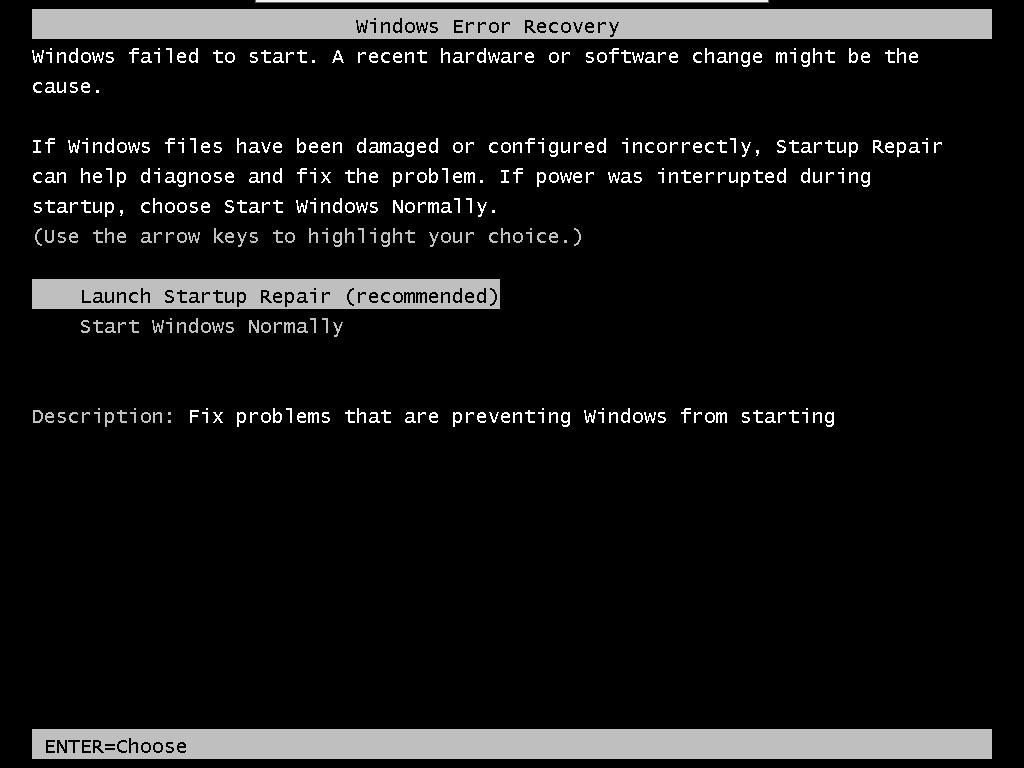
01. Reboot your computer while it’s starting up.

02. When your computer starts up again, choose the option “Launch Startup Repair”
–> PIC: http://notebooks.com/wp-content/uploads/2011/01/Recov-1.jpg

03. When the Startup repair starts, click cancel.

04. After you click cancel it will show a box. Click “Don’t Send”
–> PIC: http://i52.tinypic.com/xgjriw.png

05. Click the link “View advanced options for recovery and support”

06. In the new window click Command Prompt at the bottom.
–> PIC: http://i51.tinypic.com/50imu8.png

07. In Command Prompt type this and press enter: %windir%\system32\notepad.exe

08. Notepad will open. In notepad go to File–>Open.

09. Change the type of files notepad views from .txt to All Files (see pic)
–> PIC: http://i51.tinypic.com/35nd74z.png

10. Now in Notepad, go to C:\Windows\winsxs\ (or whichever drive Windows is installed on)

11. In that folder, find pending.xml and make a copy of it

12. Now open the original pending.xml (it will load really slow because the file is huge)

13. Press CNTRL+F and search for the following exactly: 0000000000000000.cdf-ms

14. Delete the following text (yours will be a little different):


–> PIC: http://i54.tinypic.com/adzpzp.png

Your PC might not have all 3 sections of code (, , ). Just make sure you delete section “Checkpoint” and whatever other sections have “000000000000000.cdf-ms”. They will be right next to eachother.

15. Save the file, close notepad, close command prompt, restart your computer.

How to serve attachments from a free CDN (Coral)

You can use Coral free CDN to off-load the WordPress attachments (usually images). In order to use Coral you need to add “.nyud.net” to the site DNS address. For example, http://www.alekz.net will become http://www.alekz.net.nyud.net. Coral is usually too slow to serve all static content, so the most effective solution would be to use it only for the biggest files.

Here’s a simple solution. Add the following to functions.php of your current theme:

add_filter ('wp_get_attachment_url', 'freecdn_url');

function freecdn_url ($url)
{
    if (! is_attachment () ) return $url; 
    $cdn_url = ".nyud.net";
    $decomposed_url = explode ("/", $url);
    $decomposed_url[2] =  $decomposed_url[2] . $cdn_url;
    $url = implode("/", $decomposed_url);
    return $url;
}

Your theme (e.g. the bundled “TwentyTen”) must use wp_get_attachment_url(), of course. If not – you got the idea, didn’t you? 😉

Also, you can use freecdn_url () function to rewrite any URL you want to download from Coral.

What directory PHP is busy with

The file “cwd” under /proc/pid is a symbolic link to the “current working directory”:

for i in `ps -ef | awk '/php/{print $2}'`
do
ls -l /proc/${i}/cwd
done

The result is:

lrwxrwxrwx 1 alekz alekz 0 Янв 25 02:40 /proc/11544/cwd -> /home/alekz/public_html/blog/wp
lrwxrwxrwx 1 alekz alekz 0 Янв 25 02:40 /proc/11764/cwd -> /home/alekz/public_html/alekz.net
lrwxrwxrwx 1 alekz alekz 0 Янв 25 02:40 /proc/12574/cwd -> /home/alekz/public_html/alekz.net
lrwxrwxrwx 1 alekz alekz 0 Янв 25 02:40 /proc/13081/cwd -> /home/alekz/public_html/alekz.net
lrwxrwxrwx 1 alekz alekz 0 Янв 25 02:45 /proc/15053/cwd -> /home/alekz/public_html/blog/wp
lrwxrwxrwx 1 alekz alekz 0 Янв 25 02:45 /proc/15056/cwd -> /home/alekz/public_html/blog/wp
lrwxrwxrwx 1 alekz alekz 0 Янв 25 02:49 /proc/15696/cwd -> /home/alekz/public_html/blog/wp/wp-content/plugins/si-captcha-for-wordpress/captcha-secureimage

Of course, you can use any other process name instead of php.

And here’s a “dynamic” version:

while true
do
clear
for i in `ps -ef | awk '/php/{print $2}'`
do
ls -l /proc/${i}/cwd
done
sleep 5
done

dcpumon and dcpumonview

Found another cPanel application which you can safely turn off in order to safe some bytes and cycles.

By default dcpumon runs every 5 min to log CPU usage (“top” output) :

# crontab -l | fgrep cpu
*/5 * * * * /usr/local/cpanel/bin/dcpumon >/dev/null 2>&1
#

and stores the data into /var/log/dcpumon

You can view the report with dcpumonview command:

# /usr/local/cpanel/bin/dcpumonview
———————————————————–
|User |Domain |CPU%|MEM%|MySQL#|
———————————————————–
|alekz |alekz.net |17.72|37.07|0.3 |
| Top Process | 27.8 | /usr/bin/php |
| Top Process | 14.2 | /usr/bin/php |
| Top Process | 12.3 | /usr/bin/php |
|mysql | |11.47|3.05|0.0 |
| Top Process | 11.7 | /usr/sbin/mysqld –basedir/ –datadir/var/lib/mysql –usermysql –pid-file/var/lib/mysql/alekz.pid –skip-external-locking |

How to allow blank passwords for Vista Remote Desktop

Two methods:

1. Using regedit:

HKEY_LOCAL_MACHINE\SYSTEM\ControlSet001\Control\Lsa
“LimitBlankPasswordUse”=dword:00000000

HKEY_LOCAL_MACHINE\SYSTEM\CurrentControlSet\Control\Lsa
“LimitBlankPasswordUse”=dword:00000000

2. Using Local Security Policy:

Control Panel -> Administrative Tools -> Local Security Policy (run as system administrator)
Local Security Policy -> Local Policies -> Security Options
Set “Accounts: Limit local account use of blank passwords to console logon only” to Disable

Useful links: